> ## Documentation Index
> Fetch the complete documentation index at: https://docs.tented.ai/llms.txt
> Use this file to discover all available pages before exploring further.
# Triggered Flows
> Build automated, multi-step email journeys on a visual canvas
## What's a triggered flow?
A **triggered flow** is marketing automation on autopilot: contacts enter when they match a trigger, then move through the steps you've laid out — sending emails, waiting, branching, updating fields — until they reach the end. Welcome series, onboarding sequences, re-engagement campaigns: this is where they live.
Head to **Email > Campaigns** and click **Create Triggered Flow**. Name it, and you land on the visual flow builder with three tabs: **Overview** (analytics), **Edit Flow** (the canvas), and **History**.
## Set the trigger
Click the **Trigger** node to choose how contacts enter:
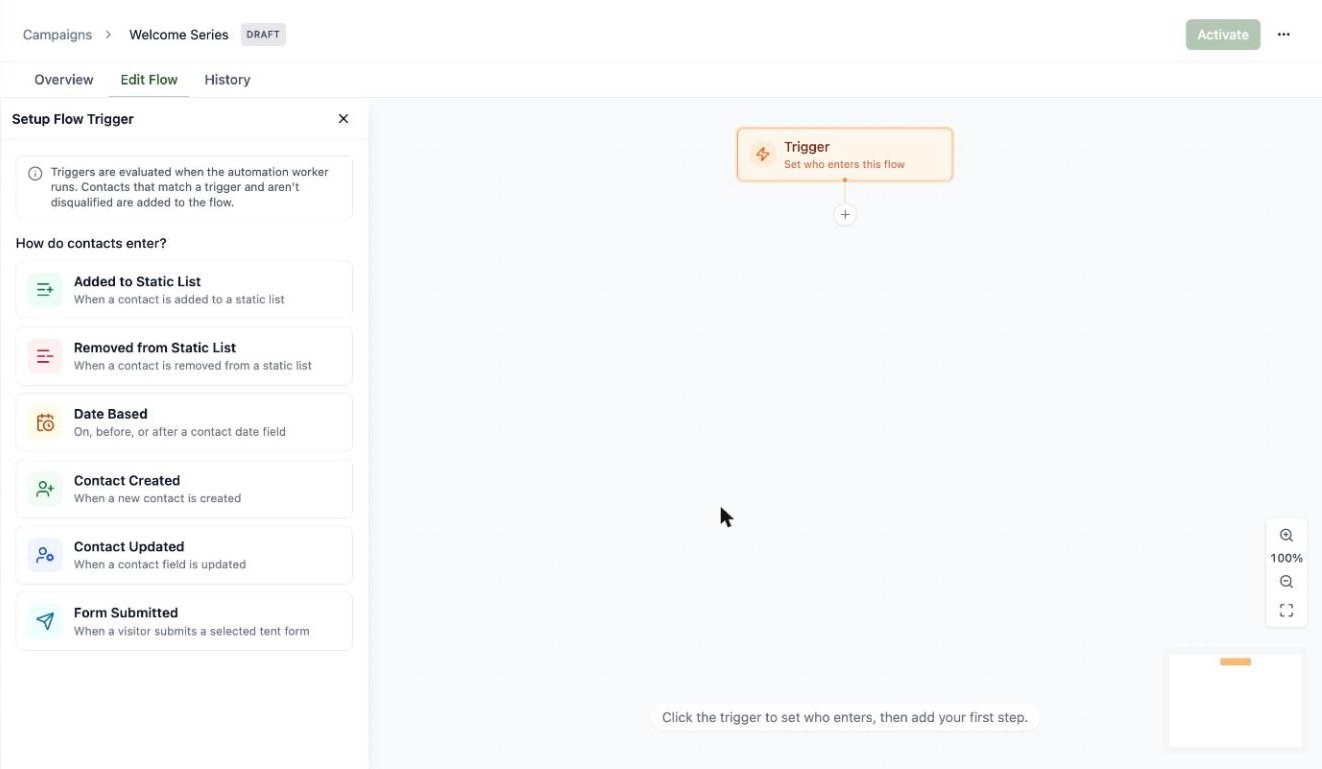 * **Added to Static List** — the classic welcome-series trigger
* **Removed from Static List**
* **Date Based** — on, before, or after a contact date field
* **Contact Created** — the moment someone new hits your database
* **Contact Updated** — when a contact field changes
* **Form Submitted** — when a visitor submits a form on one of your tents 🏕️. Each answer is also handed to the run as a [`{{campaign.dynamic.*}}` token](/email/personalization#campaign-dynamic-tokens-flows-only), so later emails can echo what was submitted.
* **Tented API** — an external system enrolls the contact by [calling the public API](/api-reference/managing-triggered-flows#trigger-a-flow-api-trigger), optionally passing values that become `{{campaign.dynamic.*}}` tokens (a coupon code, an order number, …)
You can stack multiple triggers on one flow with **+ Add trigger**.
### Qualification rules
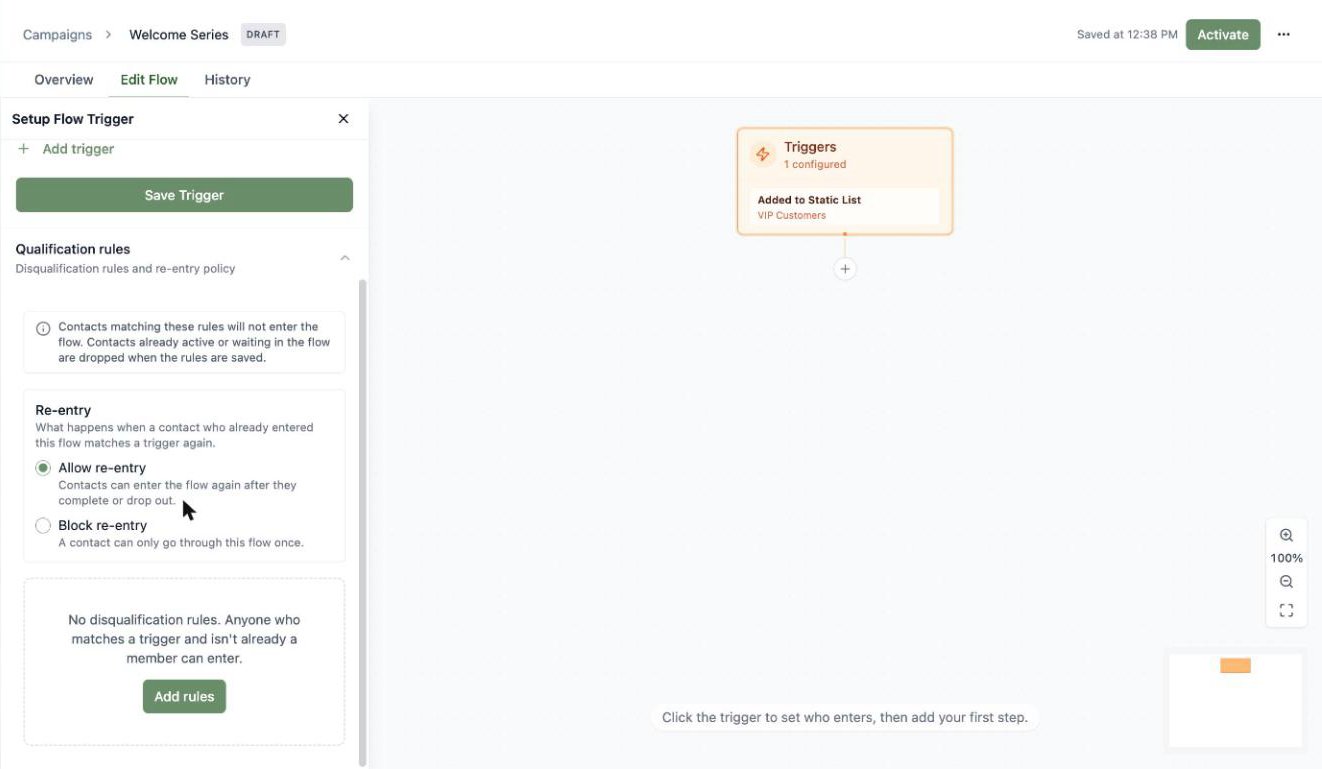
Below the triggers you'll find **Qualification rules** — the fine print of who gets in:
* **Re-entry policy**: allow contacts to go through the flow again after they finish (or block them to once ever).
* **Disqualification rules**: audience rules that keep matching contacts *out* — for example, exclude anyone whose lifecycle stage is already "Customer" from a lead-nurture flow.
* **Added to Static List** — the classic welcome-series trigger
* **Removed from Static List**
* **Date Based** — on, before, or after a contact date field
* **Contact Created** — the moment someone new hits your database
* **Contact Updated** — when a contact field changes
* **Form Submitted** — when a visitor submits a form on one of your tents 🏕️. Each answer is also handed to the run as a [`{{campaign.dynamic.*}}` token](/email/personalization#campaign-dynamic-tokens-flows-only), so later emails can echo what was submitted.
* **Tented API** — an external system enrolls the contact by [calling the public API](/api-reference/managing-triggered-flows#trigger-a-flow-api-trigger), optionally passing values that become `{{campaign.dynamic.*}}` tokens (a coupon code, an order number, …)
You can stack multiple triggers on one flow with **+ Add trigger**.
### Qualification rules
Below the triggers you'll find **Qualification rules** — the fine print of who gets in:
* **Re-entry policy**: allow contacts to go through the flow again after they finish (or block them to once ever).
* **Disqualification rules**: audience rules that keep matching contacts *out* — for example, exclude anyone whose lifecycle stage is already "Customer" from a lead-nurture flow.
 ## Build the steps
Click **+** anywhere on the canvas to add a step. You've got a full automation toolkit:
## Build the steps
Click **+** anywhere on the canvas to add a step. You've got a full automation toolkit:
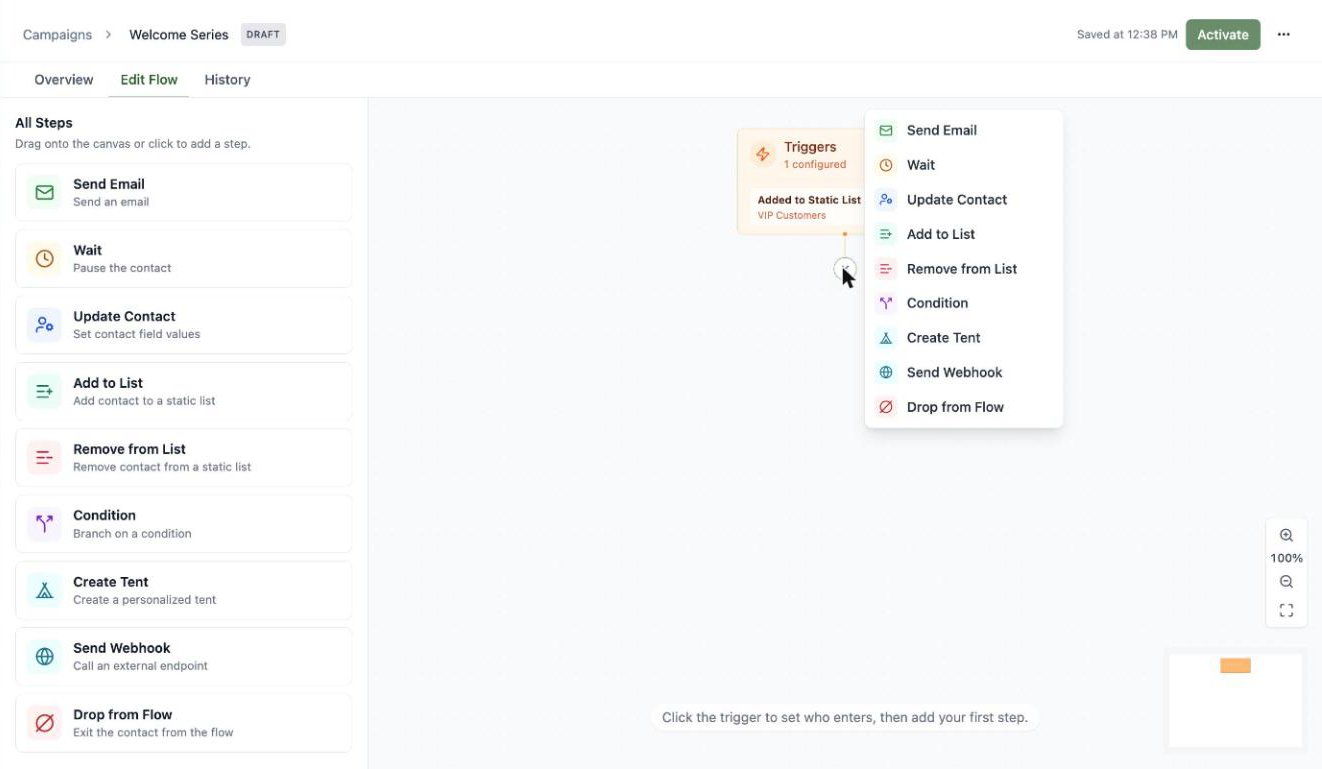 | Step | What it does |
| ---------------------------------- | ------------------------------------------------------------------------------ |
| **Send Email** | Send an approved (or inline) email |
| **Wait** | Pause for a duration, or until a contact date field |
| **Update Contact** | Set contact field values |
| **Add to List / Remove from List** | Manage static list membership |
| **Condition** | Branch the journey based on audience rules |
| **Create Tent** | Generate a personalized landing page for the contact |
| **Create Email** | Create a personalized email for the contact, ready for a later Send Email step |
| **Send Webhook** | Call an external endpoint |
| **Drop from Flow** | Exit the contact early |
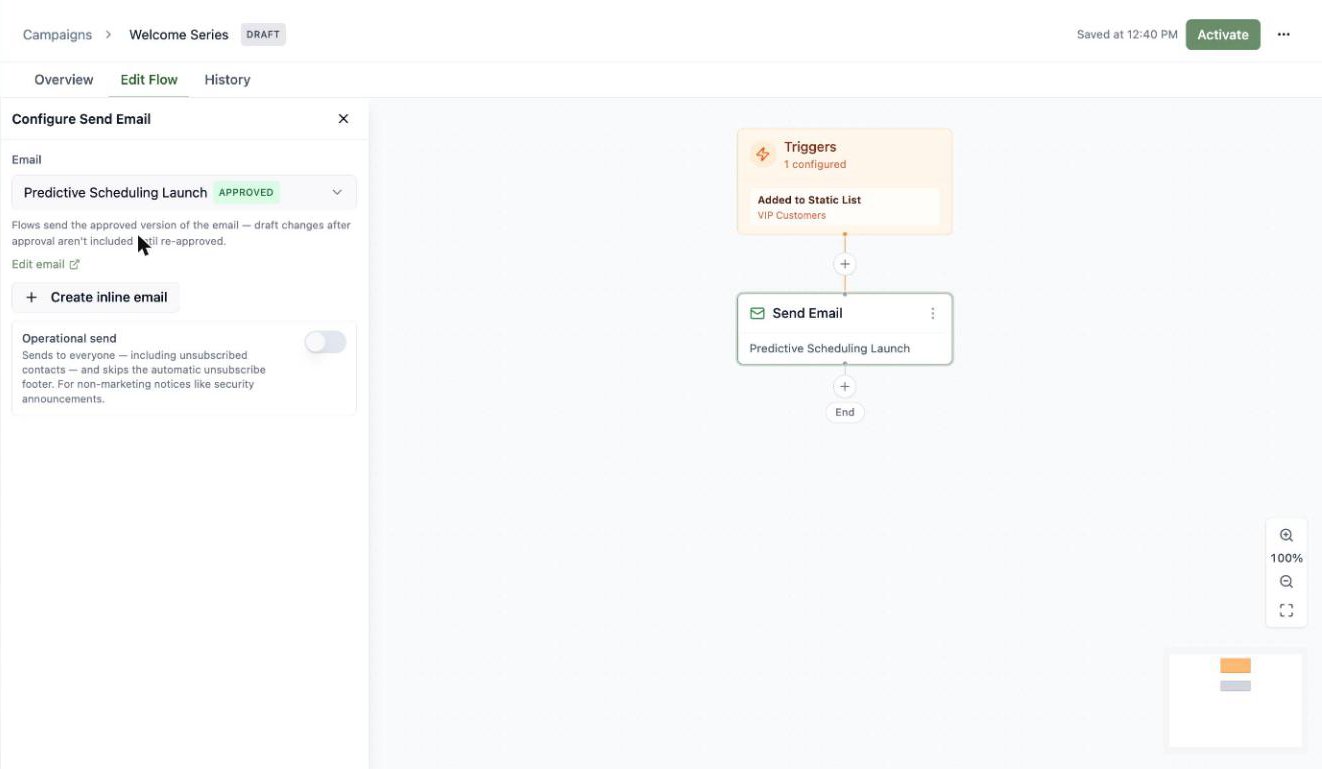
For a Send Email step, pick any **approved** email — the same approval rule as blasts — or compose one inline. There's also an operational-send toggle for non-marketing notices.
| Step | What it does |
| ---------------------------------- | ------------------------------------------------------------------------------ |
| **Send Email** | Send an approved (or inline) email |
| **Wait** | Pause for a duration, or until a contact date field |
| **Update Contact** | Set contact field values |
| **Add to List / Remove from List** | Manage static list membership |
| **Condition** | Branch the journey based on audience rules |
| **Create Tent** | Generate a personalized landing page for the contact |
| **Create Email** | Create a personalized email for the contact, ready for a later Send Email step |
| **Send Webhook** | Call an external endpoint |
| **Drop from Flow** | Exit the contact early |
For a Send Email step, pick any **approved** email — the same approval rule as blasts — or compose one inline. There's also an operational-send toggle for non-marketing notices.
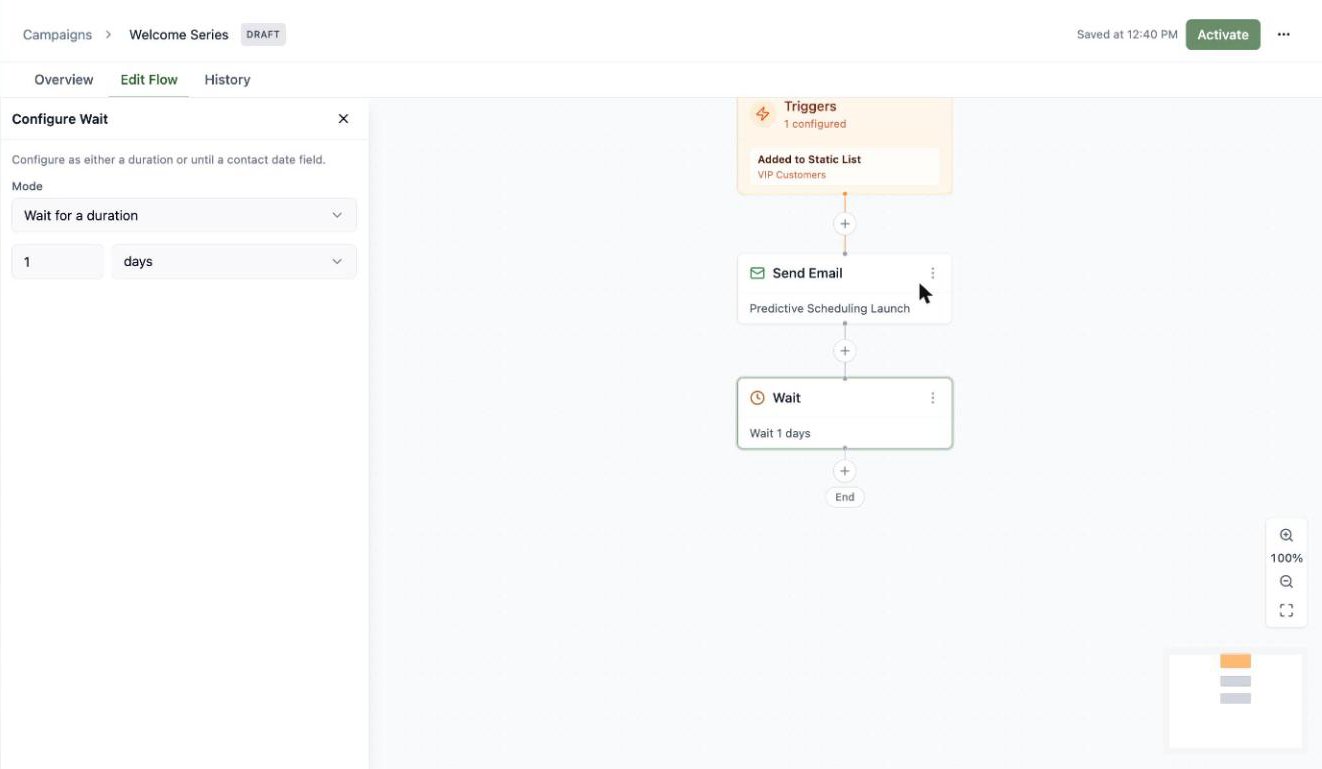
 Wait steps keep journeys humane — space your sends out instead of firing everything at once:
 ### The Create Tent step
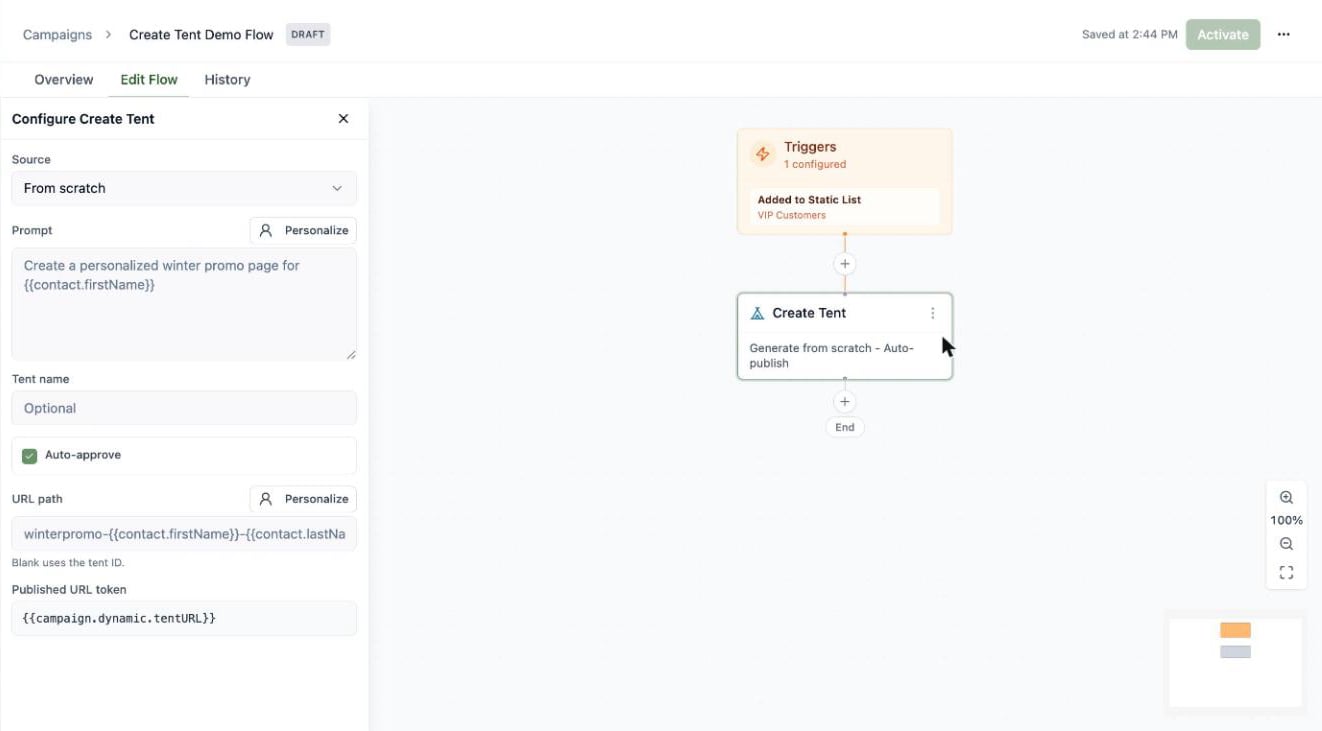
The **Create Tent** step generates a *personalized landing page for each contact* as they pass through the flow — a unique page per person, built from their contact data.
### The Create Tent step
The **Create Tent** step generates a *personalized landing page for each contact* as they pass through the flow — a unique page per person, built from their contact data.
 Configure it with:
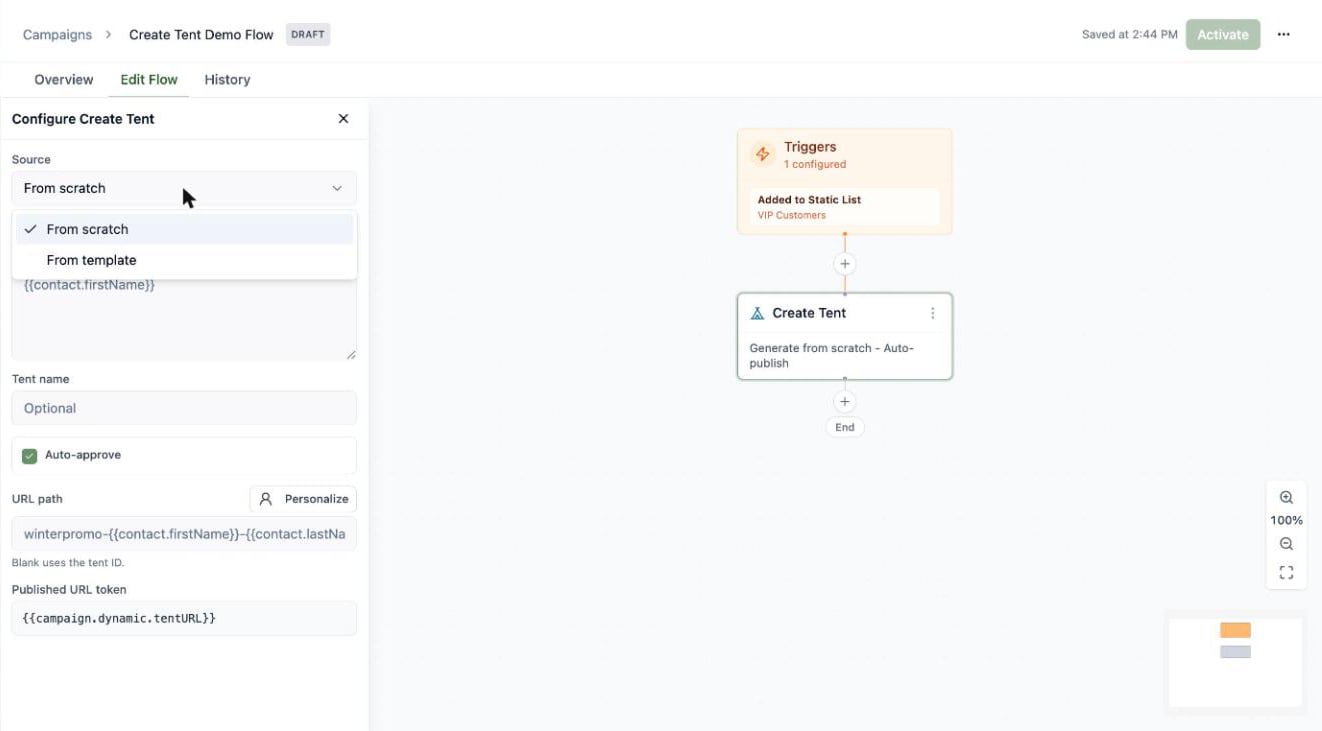
* **Source** — **From scratch** (generate with AI from a prompt) or **From template** (copy an approved tent template, no generation credits).
Configure it with:
* **Source** — **From scratch** (generate with AI from a prompt) or **From template** (copy an approved tent template, no generation credits).
 * **Prompt** — what to generate. Click **Personalize** to drop in [contact tokens](/email/creating-emails#subject-lines-preheaders-and-personalization) like `{{contact.firstName}}`, so every contact gets a page tailored to them.
* **Tent name** and **URL path** — both optional and both personalizable; a blank URL path falls back to the tent ID.
* **Auto-approve** — publish the generated tent automatically, so it's live the moment it's created.
**Use the new page's URL in a later email.** When **Auto-approve** is on, the step publishes the tent and stores its live URL in a token — shown in the panel as the **Published URL token**, `{{campaign.dynamic.tentURL}}`. Reference that token in any **Send Email** step *after* the Create Tent step, and each contact's email links to their own personalized page.
A typical shape: **Create Tent** (auto-approve, prompt personalized with `{{contact.firstName}}`) → **Send Email** whose CTA links to `{{campaign.dynamic.tentURL}}`. If you have more than one Create Tent step, the second becomes `{{campaign.dynamic.tentURL2}}`, and so on.
### The Create Email step
The **Create Email** step is the email twin of Create Tent: it creates a *personalized email for each contact* as they pass through the flow, so every person gets copy written for them rather than one shared email with merge tokens.
Configure it with:
* **Source** — **From scratch** (generate with AI from a prompt) or **From template** (start from an approved [email template](/email/email-templates); choose **Create without generation** to copy it as-is with no generation credits, or **Generate with prompt** to let AI rework it).
* **Prompt** — what to write. Click **Personalize** to drop in contact tokens, or the campaign token picker for values from earlier in the run: a form submission, API trigger tokens, or a Create Tent step's `{{campaign.dynamic.tentURL}}`, so the generated email can link to that contact's own page.
* **Email name**, **Subject**, and **Preview text** — all optional and all personalizable. A blank subject falls back to the template's default, or to the subject the AI writes for a generated email.
* **Sender** — optional from name, from address, and reply-to overrides. Leave them blank to inherit the template's defaults, then your workspace sender defaults.
* **Auto-approve** — approve the email the moment it's created, so a later Send Email step can send it without anyone opening the editor. Turn it off to leave each email as a draft for review.
**Send what the step created.** In a later **Send Email** step, set **Email source** to **Email from a Create Email step** and pick the Create Email step. Each contact then receives their own generated email. Because the step approves emails automatically, activation checks that a subject and a complete sender identity resolve from the step, the template, or your sender defaults.
A typical shape: **Create Tent** (auto-approve) → **Create Email** (prompt: "...with a button linking to `{{campaign.dynamic.tentURL}}`") → **Send Email** sending from the Create Email step. The emails the flow creates show up in your Emails list, linked to the flow, and are removed if you delete the flow.
## Activate it
Click **Activate** and your flow goes live: from now on, contacts matching a trigger are enrolled automatically and start moving through the steps.
Activating flows requires a **Pro or Max** plan. On the Free plan you can build, edit, and save flows — the canvas shows a reminder, and an **Upgrade to Unlock** gem appears in place of the Activate button. If a workspace downgrades to Free, its active flows are **paused automatically** (members stay put, and resume if you upgrade and reactivate). See [Upgrading Your Plan](/billing-subscriptions/upgrading-plan).
* **Prompt** — what to generate. Click **Personalize** to drop in [contact tokens](/email/creating-emails#subject-lines-preheaders-and-personalization) like `{{contact.firstName}}`, so every contact gets a page tailored to them.
* **Tent name** and **URL path** — both optional and both personalizable; a blank URL path falls back to the tent ID.
* **Auto-approve** — publish the generated tent automatically, so it's live the moment it's created.
**Use the new page's URL in a later email.** When **Auto-approve** is on, the step publishes the tent and stores its live URL in a token — shown in the panel as the **Published URL token**, `{{campaign.dynamic.tentURL}}`. Reference that token in any **Send Email** step *after* the Create Tent step, and each contact's email links to their own personalized page.
A typical shape: **Create Tent** (auto-approve, prompt personalized with `{{contact.firstName}}`) → **Send Email** whose CTA links to `{{campaign.dynamic.tentURL}}`. If you have more than one Create Tent step, the second becomes `{{campaign.dynamic.tentURL2}}`, and so on.
### The Create Email step
The **Create Email** step is the email twin of Create Tent: it creates a *personalized email for each contact* as they pass through the flow, so every person gets copy written for them rather than one shared email with merge tokens.
Configure it with:
* **Source** — **From scratch** (generate with AI from a prompt) or **From template** (start from an approved [email template](/email/email-templates); choose **Create without generation** to copy it as-is with no generation credits, or **Generate with prompt** to let AI rework it).
* **Prompt** — what to write. Click **Personalize** to drop in contact tokens, or the campaign token picker for values from earlier in the run: a form submission, API trigger tokens, or a Create Tent step's `{{campaign.dynamic.tentURL}}`, so the generated email can link to that contact's own page.
* **Email name**, **Subject**, and **Preview text** — all optional and all personalizable. A blank subject falls back to the template's default, or to the subject the AI writes for a generated email.
* **Sender** — optional from name, from address, and reply-to overrides. Leave them blank to inherit the template's defaults, then your workspace sender defaults.
* **Auto-approve** — approve the email the moment it's created, so a later Send Email step can send it without anyone opening the editor. Turn it off to leave each email as a draft for review.
**Send what the step created.** In a later **Send Email** step, set **Email source** to **Email from a Create Email step** and pick the Create Email step. Each contact then receives their own generated email. Because the step approves emails automatically, activation checks that a subject and a complete sender identity resolve from the step, the template, or your sender defaults.
A typical shape: **Create Tent** (auto-approve) → **Create Email** (prompt: "...with a button linking to `{{campaign.dynamic.tentURL}}`") → **Send Email** sending from the Create Email step. The emails the flow creates show up in your Emails list, linked to the flow, and are removed if you delete the flow.
## Activate it
Click **Activate** and your flow goes live: from now on, contacts matching a trigger are enrolled automatically and start moving through the steps.
Activating flows requires a **Pro or Max** plan. On the Free plan you can build, edit, and save flows — the canvas shows a reminder, and an **Upgrade to Unlock** gem appears in place of the Activate button. If a workspace downgrades to Free, its active flows are **paused automatically** (members stay put, and resume if you upgrade and reactivate). See [Upgrading Your Plan](/billing-subscriptions/upgrading-plan).
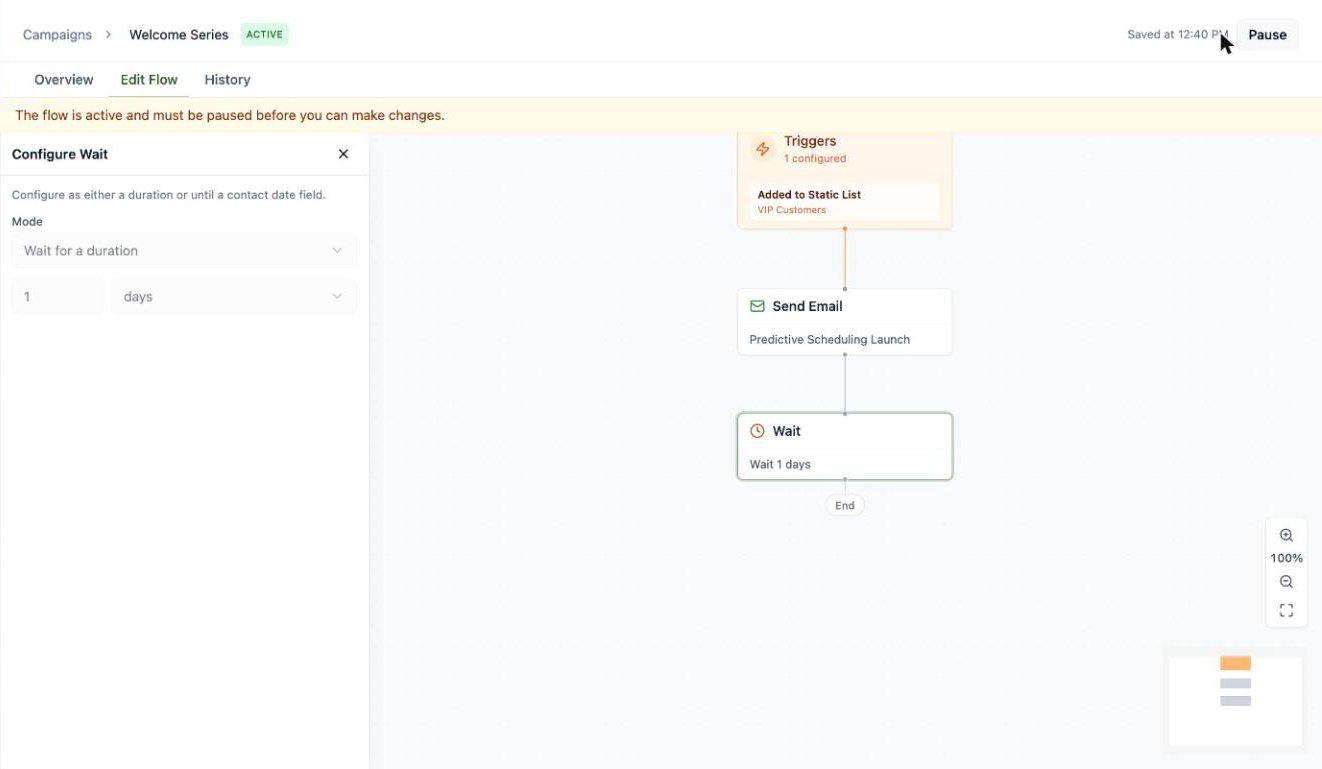 Active flows are locked for editing — hit **Pause** first if you need to make changes, then reactivate. Pausing doesn't kick anyone out: contacts already in the flow simply wait, and pick up where they left off when you reactivate. Triggers fire on *new* events after activation (evaluated about once a minute); contacts already on a list won't enter an "Added to Static List" flow retroactively.
Retiring a flow for good? Pause it, then **Archive** it from the header's overflow menu — the flow moves out of your active campaigns with its run history preserved, and you can find it under the **Archived** status filter on the Campaigns tab. Archiving can't be undone: contacts still waiting in the flow stay in its history, but the flow never resumes. See [Archive a campaign](/email/email-blasts#archive-a-campaign) for the full rules.
## Track performance
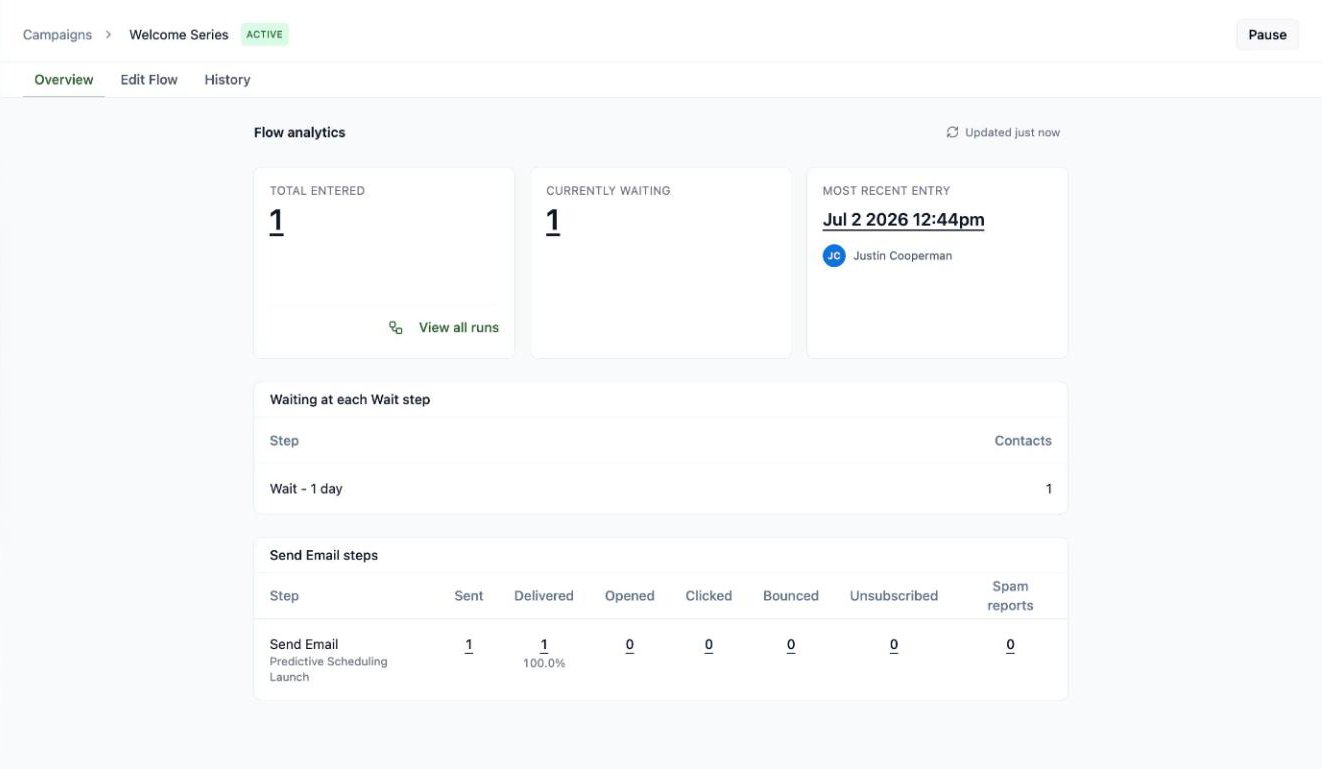
The **Overview** tab shows your flow's vitals: total contacts entered, how many are currently waiting, the most recent entry, who's parked at each Wait step, and per-email stats (sent, delivered, opened, clicked, bounced, unsubscribed, spam).
Active flows are locked for editing — hit **Pause** first if you need to make changes, then reactivate. Pausing doesn't kick anyone out: contacts already in the flow simply wait, and pick up where they left off when you reactivate. Triggers fire on *new* events after activation (evaluated about once a minute); contacts already on a list won't enter an "Added to Static List" flow retroactively.
Retiring a flow for good? Pause it, then **Archive** it from the header's overflow menu — the flow moves out of your active campaigns with its run history preserved, and you can find it under the **Archived** status filter on the Campaigns tab. Archiving can't be undone: contacts still waiting in the flow stay in its history, but the flow never resumes. See [Archive a campaign](/email/email-blasts#archive-a-campaign) for the full rules.
## Track performance
The **Overview** tab shows your flow's vitals: total contacts entered, how many are currently waiting, the most recent entry, who's parked at each Wait step, and per-email stats (sent, delivered, opened, clicked, bounced, unsubscribed, spam).
 ### See every run
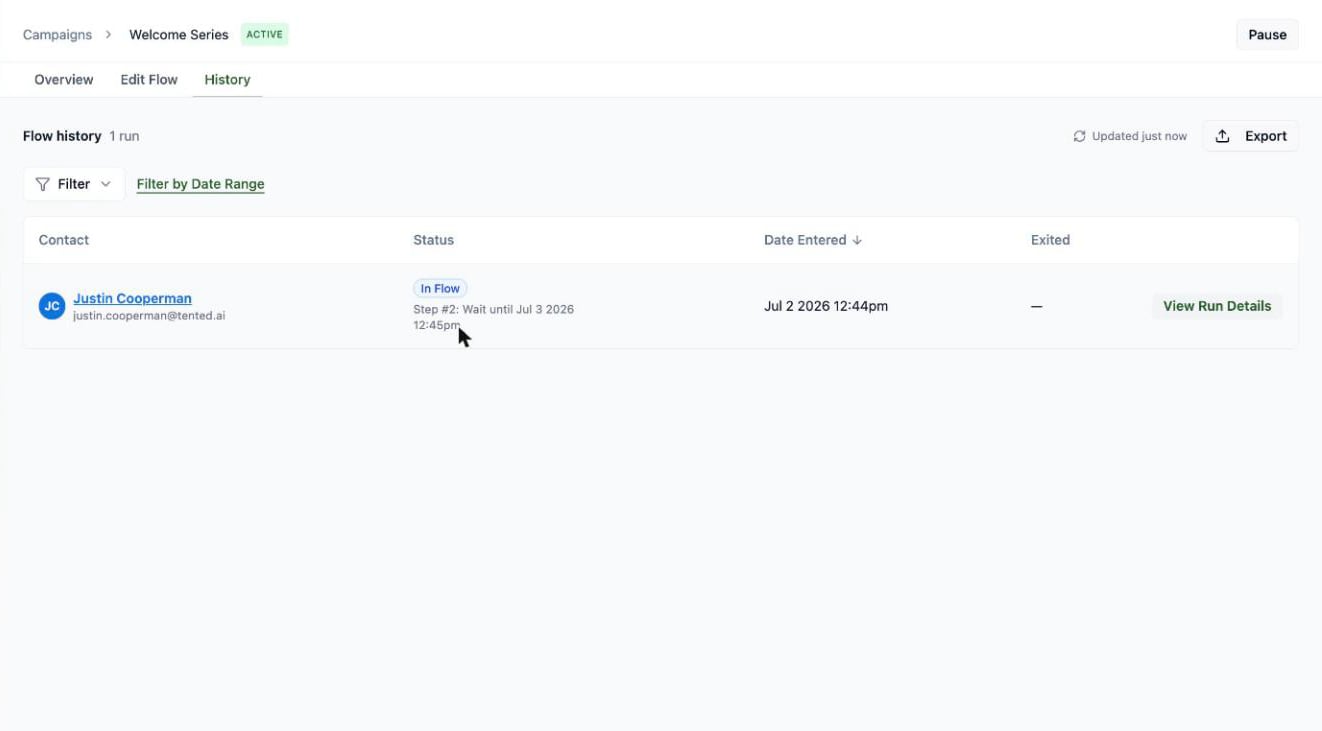
The **History** tab lists every contact who's been through the flow — their status (In Flow, Completed, Exited), when they entered, and when they left. Filter by status or date range, and click **Export** for a CSV.
### See every run
The **History** tab lists every contact who's been through the flow — their status (In Flow, Completed, Exited), when they entered, and when they left. Filter by status or date range, and click **Export** for a CSV.
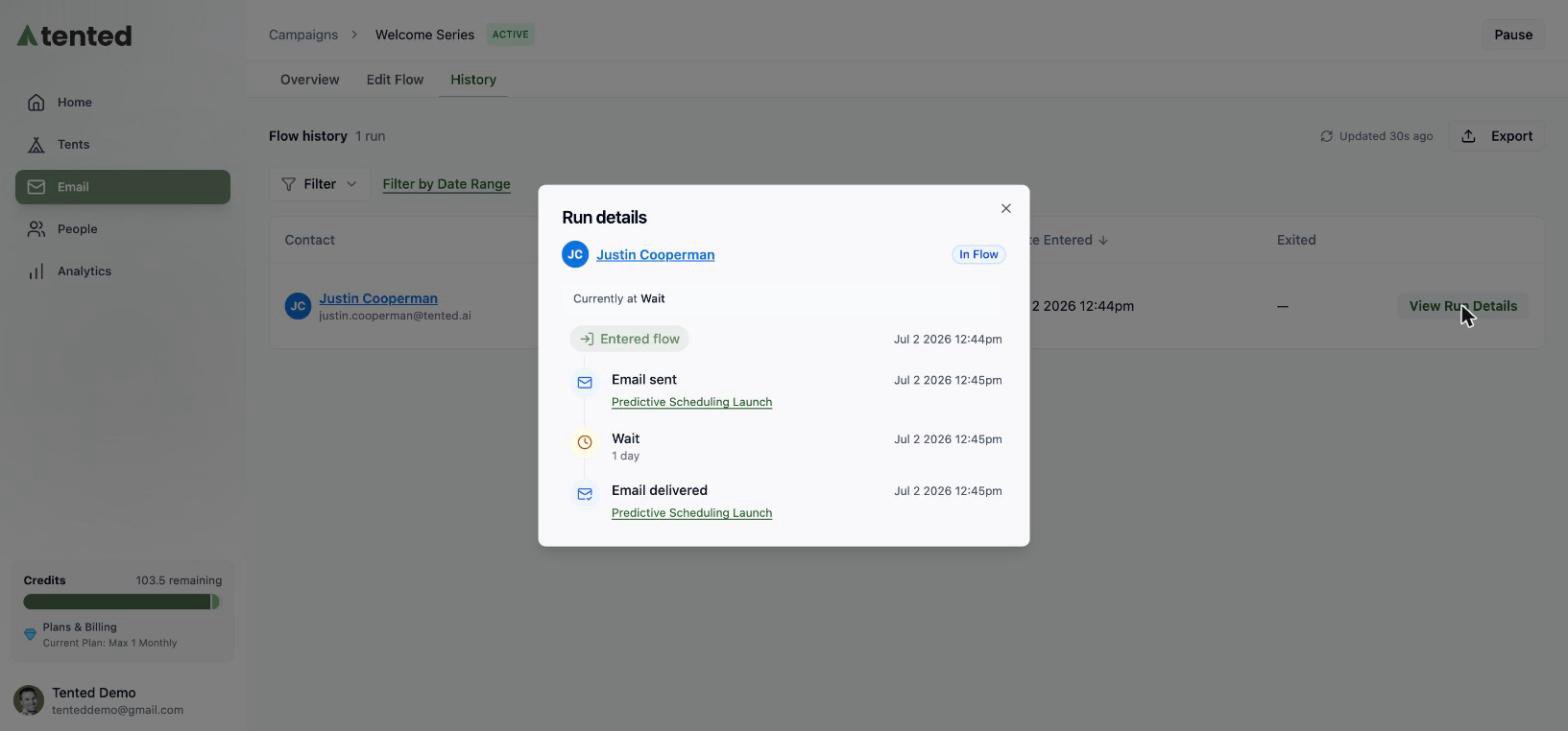
 Click **View Run Details** on any run to see that contact's exact path through the flow — a step-by-step timeline of what happened and when (entered flow, email sent, wait, email delivered), with the contact's current position highlighted.
 ## Flow or blast?
Reach for a **blast** when it's one message, one audience, one moment — a launch, a newsletter issue. Reach for a **flow** when the sending should happen *by itself* whenever someone qualifies — welcomes, nurtures, onboarding. Most teams end up with both.
## Flow or blast?
Reach for a **blast** when it's one message, one audience, one moment — a launch, a newsletter issue. Reach for a **flow** when the sending should happen *by itself* whenever someone qualifies — welcomes, nurtures, onboarding. Most teams end up with both.